
I tried to design headphone amplifier with a high fidelity sound, small sized and simple construction. I choosed integrated circuit TPA6120 from Texas Instruments. I designed mechanical construction that boards can be simply plugged in a Hammond box and almost all connectors and controls are directly soldered to the board. In amplifier box is included complete power supply on a separated board that amplifier is directly connected to the 230V line voltage.
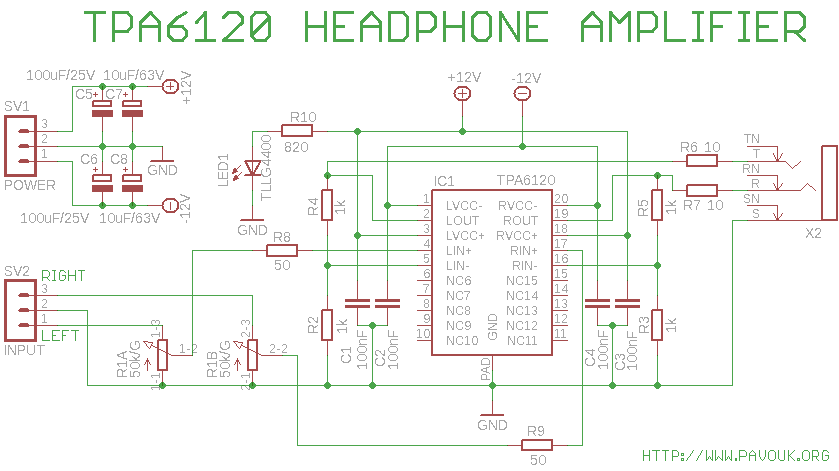
Circuit TPA6120 includes two high power opeartional amplifiers with very low distortion and high signal to noise ration. Input signal goes to dual potentiometer R1 and next via resistors R8 and R9 on the noninverting input of amplifier. With resistors R4 and R2 eventually R5 and R3 is connected feedback from amplifier outputs to the inverting inputs. His identical value set the gain to 2. With setting value of R4 and R5 to 2k we get gain 3. For required gain we select values that resistance must not exceed 10k. Outputs of amplifier are connected via R6 and R7 because we need isolate amplifier from capacitive load and prevent oscillations. Very close to package are placed capacitors C1 to C4 on the voltage rails for better stability of amplifier. Around the supply connector are assembled electrolytic capacitors C5 to C8 for additional voltage rails filtering.
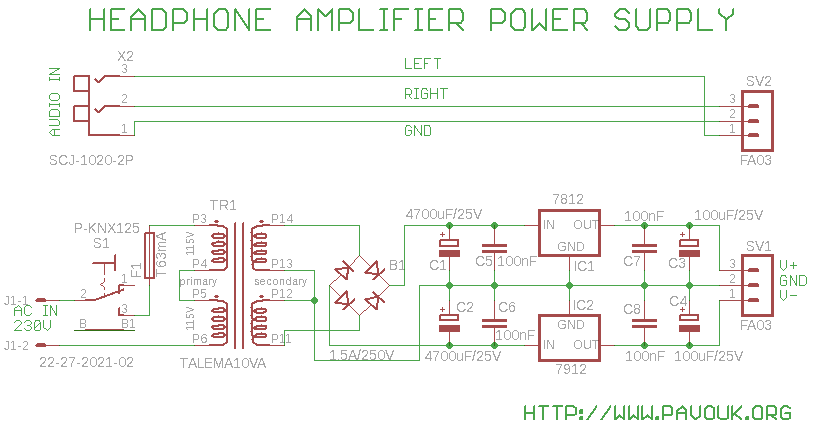
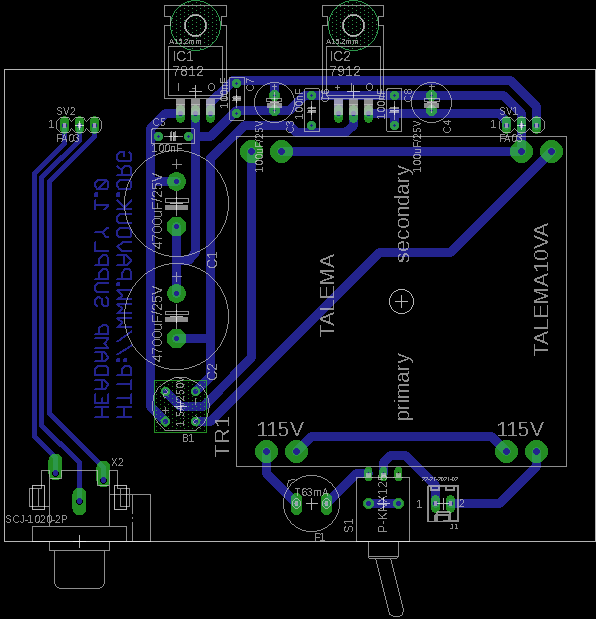
Supply board includes complete power supply. Line voltage 230V goes to the connector J1 and next to power switch S1 and fuse F1 to the toroid transformer 2x 15V TR1. His output goes to the bridge rectifier B1 and is filtered with big capacitors C1 and C2. Filtered positive and negative voltage goes to the voltage regulators IC1 and IC2 which are decoupled with small capacitors C5 to C8. Regulated output is filtered with capacitors C3 and C4. Output goes to the SV1 connector. On the back board is also included dual cinch connector X2 which is connected to the SV2 connector.
On the amplifier board we begin with assembling of TPA6120. It is a big problem because it has PowerPAD package with a small cool pad from a bottom of chip which must be soldered to the board for a sufficient cooling of the amplifier. Thanks to this we doesn't need additional heat sink but it must be soldered with a soldering paste and a hot air or in a small PCB oven. When we succesfully solder this chip that assembling of other components is very easy. We continue with resistors, capacitors, connectors and last with potentiometer.
On the power supply board we assemble small components to the biggest. We must be carefully with connectors for their straight position with a board edge to avoid future troubles with installation of boards to an enclosure.
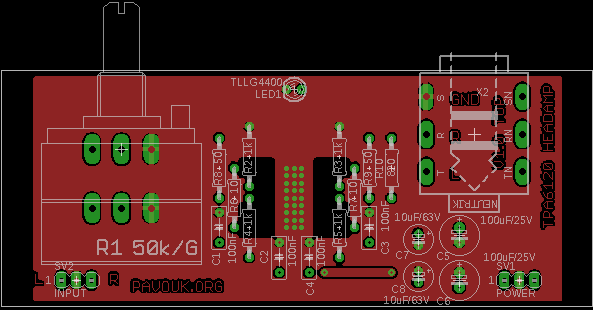
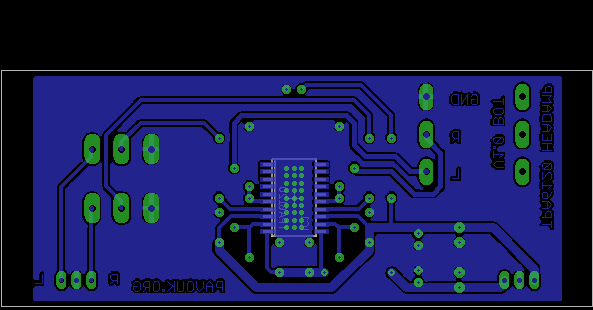
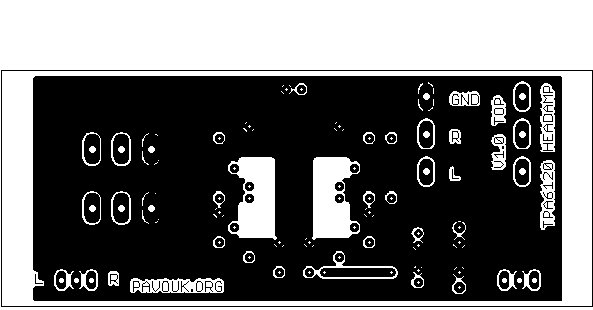
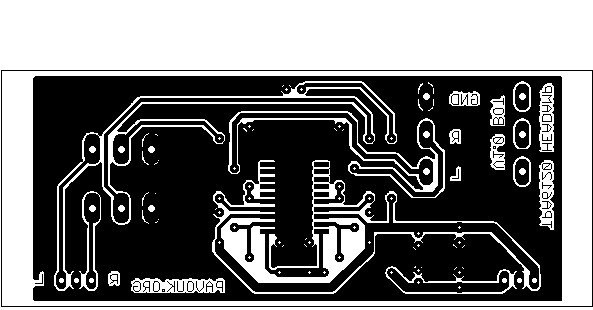
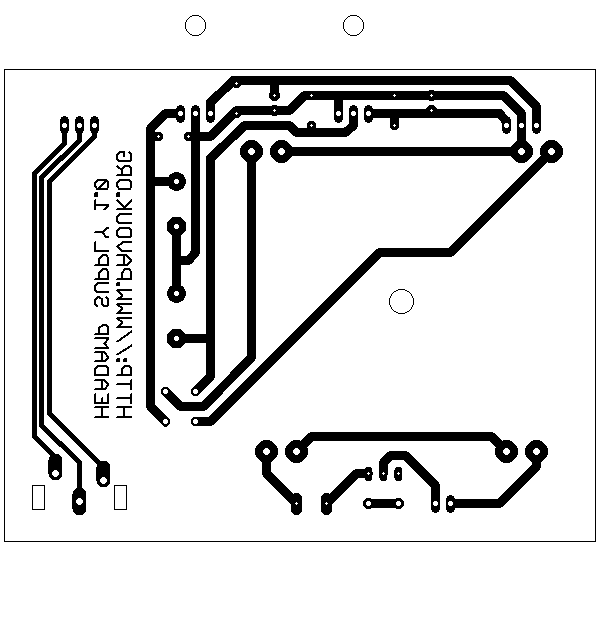
Amplifier circuit requires double-sided printed circuit board with vias because it is cooled via copper plates. Under circuit is many vias according to recommendations in application notes for PowerPAD package. From a top side copper plate is missing close to pins for preventing of capacitive coupling which can cause amplifier instability. On the sides is copper already missing for isolating of board from a metal enclosure. I ordered board at Seeed Studio company. Theoretically can be board created single-sided with one wire and cooling of chip solve with other method like glue small heat sink or drill hole under chip and solder heat sink.
Power supply board is very simple and is single-sided. We must precise cut board edges for perfect fit to the enclosure. It can be created in amateur conditions. I ordered it at Mr. Kohout. Both boards are designed for inserting them to the enclosure and precise connection for connectors. When we use longer enclosure 160mm, 220mm instead of 120mm that we must connect boards together with a small cables.
Circuit TPA6120 I purchased at Farnell company. Supply transformer is toroid type for small radiation of magnetic field from TALEMA manufacturer. I bought them at FK Technics company. HAMMOND enclosure 1455N1202 is offered in neighbour at FK Technics and SOS Electronics. Identical enclosure but with aluminium plates instead of plastics has name 1455N1201 and boxes in black finish have suffix BK. I used high quality potentiometer from a japanese company ALPS. We can use value between 10k and 50k in dual logarithmic version. I used electrolytic capacitors with a low ESR and for temperature 105°C. Foil capacitors are high quality types from a WIMA manufacturer and resistors are with precision of 1%. Jack connector for headphones is from Neutrik. Next I found out that there exists similar cheap connectors from chinese but with swapped all opening and closing pins. Except parts in a list we need purchase enclosure, potentiometer knob, line in connector or cord. It is a good idea to screw small heat sinks on the voltage regulators, because they are a little hot.
| name | value and type | quantity |
|---|---|---|
| R1 | 10k-50k/G dual potentiometer ALPS-RK27 | 1x |
| R2-R5 | 1k 1% | 4x |
| R6, R7 | 10R 1% | 2x |
| R8, R9 | 50R 1% | 2x |
| R10 | 820R | 1x |
| C1-C4 | 100nF/63V foil RM5 | 4x |
| C5, C6 | 100uF/25V electrolytic low ESR 105°C RM2.5 | 2x |
| C7, C8 | 10uF/63V electrolytic low ESR 105°C RM2 | 2x |
| IC1 | TPA6120 | 1x |
| LED1 | Green 2mm cylindrical | 1x |
| SV1, SV2 | Jumper ribbon 3 pins 90° | 2x |
| X2 | Socket 6.3 stereo NTR-NYS215 | 1x |
| name | value and type | quantity |
|---|---|---|
| B1 | Bridge rectifier 1.5A/100V | 1x |
| C1, C2 | 4700uF/25V electrolytic low ESR 105°C RM7.5 | 2x |
| C3, C4 | 100uF/25V electrolytic low ESR 105°C RM2.5 | 2x |
| C5-C8 | 100nF/63V foil RM5 | 4x |
| F1 | Radial fuse T63mA to the PCB | 1x |
| IC1 | 7812 package TO220 | 1x |
| IC2 | 7912 package TO220 | 1x |
| J1 | Socket with a lock PSH02-02 + opposite side | 1x |
| S1 | P-KNX125 | 1x |
| SV1, SV2 | Jumper socket 3 pins 90° | 2x |
| TR1 | Transformer TALEMA 2x 15V 10VA | 1x |
| X2 | Dual Cinch socket to the PCB SCJ-1020-2P gold | 1x |
With this amplifier construction I tried to reach a high quality reproduction in a combination with simple mechanical construction and low price. I worried about hum and noise from a close transformer but it was unapproved. Amplifier sounds really great without hearable distortion and quality of sound is better than what I expected.
-
 English
 Česky
Česky